The smooth, metallic surface of a titanium golf club head hides a messy reality. Though it looks homogenous to the naked eye, the head is actually made of individual grains of metal, of many different sizes and shapes. Some of the grains have different ingredients, perhaps a little more vanadium here, a bit more aluminum there. The grains might also have different crystalline structures, some hexagonal close-packed and others body-centered cubic. These differences in composition and structure mean that at the microscopic scale, titanium golf club heads—or any other metal object—are anything but homogenous. Little differences in composition and structure can lead to significant differences in strength and stiffness. And this means that stress can be distributed very unevenly through a piece of metal. A defect in the titanium golf head could mean the difference between a hole-in-one and a shattered golf club; a defect in a titanium spacecraft wing or a steel I-beam could mean disaster. Despite the importance of the internal microscale structure, or microstructure, engineers have had few ways to directly view or test how metals’ graininess leads to creep, cracking, and catastrophic failure. They have had to treat metals as homogenous blocks. But now, researchers have used high-energy diffraction microscopy at the U.S. Department of Energy’s Advanced Photon Source (APS) to show how inter-granular stresses evolve under loading in a titanium alloy. Their work will allow engineers to illuminate stress and deformation at the microstructure scale, a scale at which they were formerly blind. Engineers will be able to design better materials and improve public safety by reducing the uncertainty in the lifetime of structural materials.
Titanium alloys are important aerospace materials because of their unique blend of properties including high strength, low density, and their ability to stay strong at temperatures that would melt many other metals. However, titanium alloys do have a tendency to creep, meaning they slowly deform over time due to mechanical stress. Creep tends to be worsened by the elevated temperatures common in aerospace applications.
In order to see creep at the mesoscale, that is, the scale where a metal stops looking homogenous and begins to reveal its heterogenous granular structure, researchers from the Air Force Research Laboratory, Lawrence Livermore National Laboratory, PulseRay, the Deutsches Elektronen-Synchrotron (DESY-PETRA III, Germany), and Carnegie Mellon University combined information from both far-field and near-field high-energy diffraction microscopy and micro-tomography carried out at the X-ray Science Division 1-ID-E beamline at the APS, which is an Office of Science user facility. They imaged each grain within a millimeter-sized piece of titanium-aluminum (Ti-7Al) alloy to reveal how the individual grains moved and changed while the metal was put under tensile load. The 1-ID-E beamline was uniquely suited to this project because it is one of the few high-energy monochromatic synchrotron beamlines in the world with the wide variety of detectors, positioning stages, and optics needed for high-energy diffraction microscopy and micro-tomography.
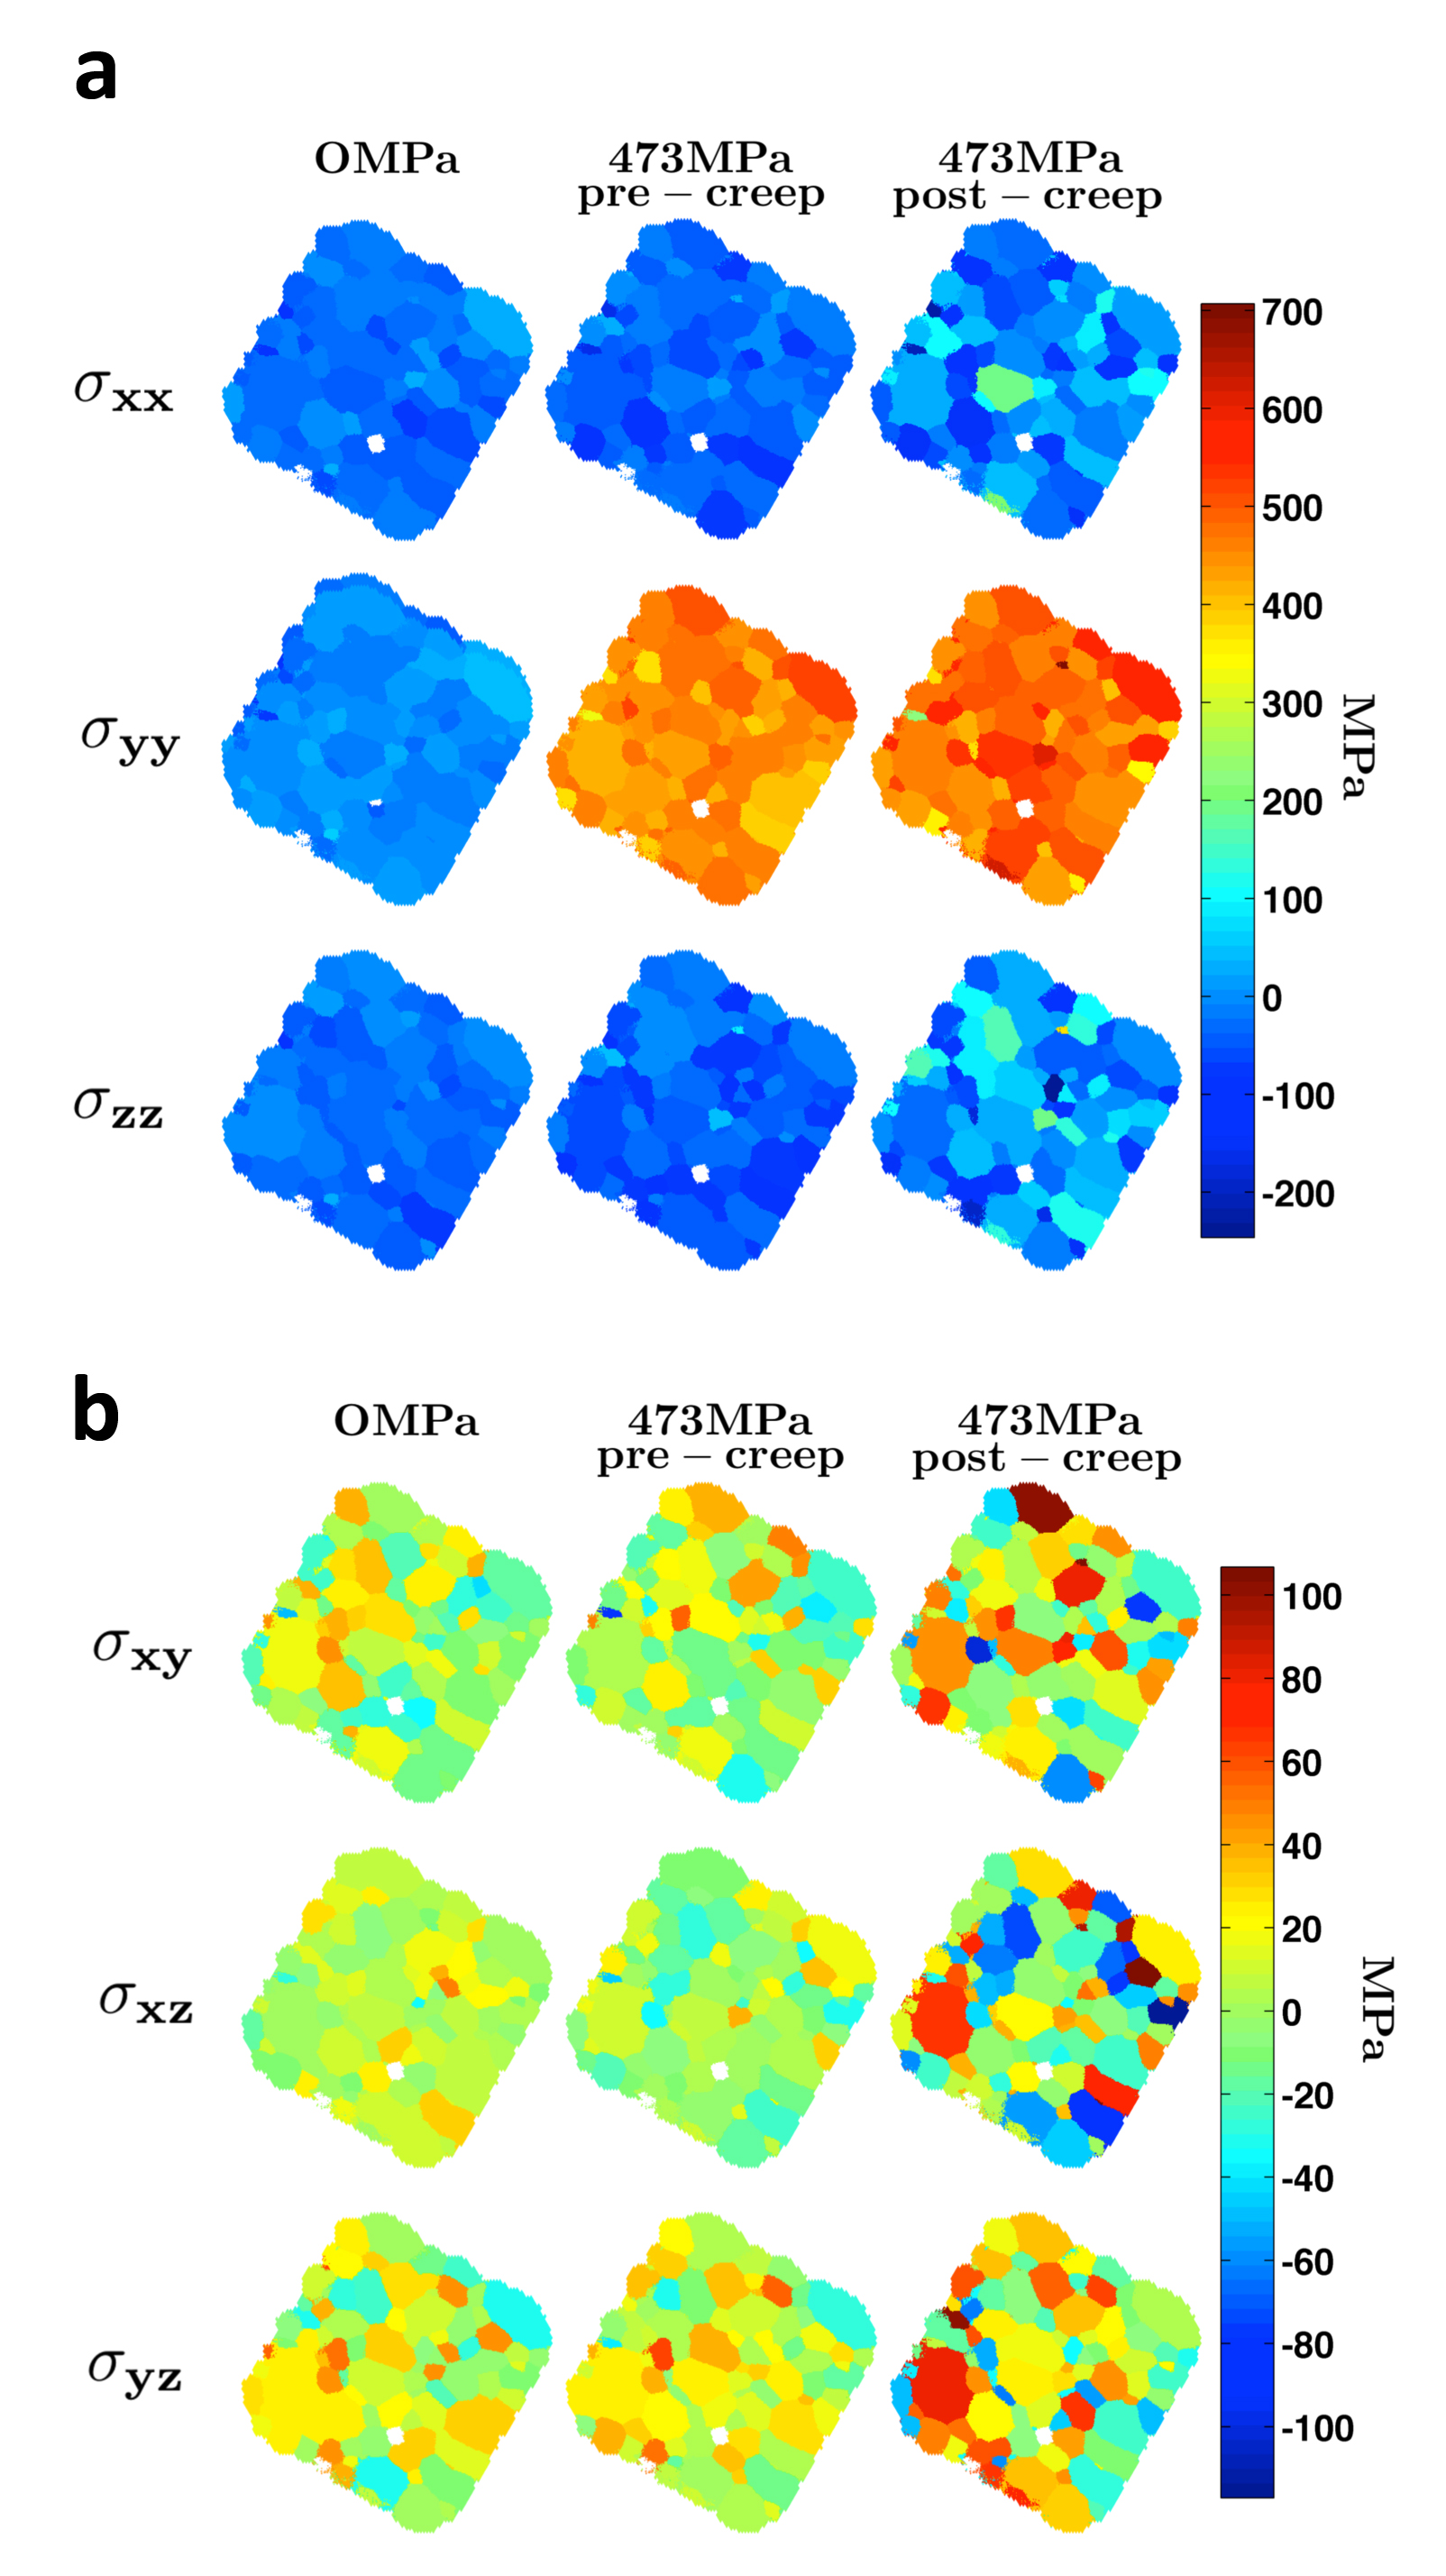
Their results show that creep deformation is more complicated than the Schmid factor analysis commonly used by engineers. In particular, the stresses on the individual grains become more heterogeneous (Fig. 1), differing from grain to grain, as the material creeps. The researchers chose to look at Ti-7Al because it closely mimics the hexagonal close-packed phase in many important industrial titanium alloys but has an overall simpler microstructure. Studying this alloy might give clues to the underlying mechanisms of mysterious phenomena such as dwell fatigue that plague industrial alloys, as well as the mesoscale conditions that cause cracking and catastrophic failure.
The most important product of this research is the innovative way the researchers combined near- and far-field high-energy diffraction microscopy with micro-tomography and in situ loading to show detailed images of the alloy’s internal structure and loading state. The researchers hope their technique allows others to collect extensive datasets of many industrially important crystalline materials’ behavior under stress. Such data will produce standard models of metal deformation and failure at the mesoscale, a major step on the way to intelligent design of new materials with optimized properties and less uncertain lifetimes. — Kim Krieger
See: Jay C. Schuren1‡, Paul A. Shade1*, Joel V. Bernier2, Shiu Fai Li2, Basil Blank3, Jonathan Lind3,6, Peter Kenesei4, Ulrich Lienert5, Robert M. Suter6, Todd J. Turner1, Dennis M. Dimiduk1, and Jonathan Almer4, “New opportunities for quantitative tracking of polycrystal responses in three dimensions,” Curr. Opin. Solid State Mater. Sci. 19, 235 (2015). DOI: 10.1016/j.cossms.2014.11.003
Author affiliations: 1Air Force Research Laboratory, 2Lawrence Livermore National Laboratory, 3PulseRay, 4Argonne National Laboratory, 5DESY-PETRA III, 6Carnegie Mellon University ‡Present address: Nutonian, Inc.
Correspondence: *[email protected]
This work was supported by the Materials & Manufacturing Directorate of the U.S. Air Force Research Laboratory. This research used resources of the Advanced Photon Source, a U.S. Department of Energy (DOE) Office of Science User Facility operated for the DOE Office of Science by Argonne National Laboratory under Contract No. DE-AC02-06CH11357.
Argonne National Laboratory is supported by the Office of Science of the U.S. Department of Energy. The Office of Science is the single largest supporter of basic research in the physical sciences in the United States, and is working to address some of the most pressing challenges of our time. For more information, please visit science.energy.gov.

